Monday, August 27, 2007

New Chandelier

Forgot to mention last night that we picked up a new chandelier for the dining room. I was at Lowe's (dear Lowe's!) looking for a replacement light fixture for this anomalous--and broken--little fixture we've got sort of slapped up at random on the kitchen ceiling.

They were apparently switching out their inventory, because they had very little in the way of oil-rubbed-bronze-trimmed dome lights, much to my disappointment. However, they did have this tasty little number:
Rust-finished 5-light chandelier with amber crushed glass shades

Stylish, no? You can't tell from the picture, but the shades contain little chips of different-colored glass--mostly browns and tans, but also little flecks of red! So appropriate!

Matt & I had tentatively mooted about the idea of replacing the fan in the dining room with a nice chandelier to make the whole thing a little more dining-roomish, but we hadn't come to any firm decision. However, the chandelier (normally $140) was on sale: guess the price!

$20!
-------
(Okay, you have to highlight the empty space above to see the price. It was so ridiculously low, I felt it deserved a kind of dramatic reveal.)

Yowza. That's monumentally cheap.

So even though it wasn't in our (tightly regulated) budget, and Matt and I hadn't had the chance to discuss it, I felt morally obliged to purchase it. If we can't use it, someone or other among our friends and family might be able to.

I think it is going to work out though. Here's what I like about it: It combines a clean-lined but antique look with a hint of contemporary urban sophistication. In this way, I think, it harmonizes with our bamboo floors, high ceilings, wavery-glassed windows, and Ikea furniture. It's a combination of old and new. Also, I like the little red flecks.

Sunday, August 26, 2007

Pre-Parental Frenetic Burst of Activity

So Mom & Dad were coming into town to check out our progress on the house. Seemed wise to actually have some progress to show them.

So for the past months, we've really moved into high gear around the place. The initial goal was to have achieved a state of doneishness wherein all essentials would have been completed, and only fluffy stuff--like replacing ugly light fixtures or installing a ceiling fan on our porch--would be left to accomplish at our leisure.

To be specific, this was my initial goal. Matt, who is able to learn from history and thereby avoid repeating his mistakes, was well aware that I was cosmically, wildly, ludicrously delusional to think we had the time or money to accomplished everything by late August.

Consequently, instead of installing all of the needed baseboards (in the master bed, study, and hall), we contented ourselves with the baseboards in the dining room. Instead of installing the rest of the flagstones for our patio and weeding, mulching, and edging all of our beds, we were pretty darn proud of ourselves for having (mostly) completed the front-side bed, a long, L-shaped number that encloses what I like to think of as the Croquet Lawn. Instead of refinishing both the tubs, I half-finished the guest tub, leaving it in a state of sticky incompletion. (That darn epoxy still hasn't dried in some places.)

Still, we worked our little tails off to get this much done, and what we did really does make a difference, especially in the dining room. (Making baseboards out of planks, by the way, is not for the wimpy, especially when both the walls and floor waver wildly all over the place. 10 x 1s don't exactly accommodate themselves to the vagaries of turn-of-the-century construction.)

Nekkid walls. Note the handful of turquoise spacers, leftover from our bambooing days.

Ooooo! Lovely new baseboards! They currently look one stage better than this pic: all the gaps have been filled in with wood putty, and they've received a new coat of paint.

Mom & Dad were very sweetly complimentary about everything, in spite of its half-finished state. They kept saying that they were amazed by how much we had achieved, which was very gratifying. Apparently, The Family at large (whom they have been visiting recently), were also surprised and impressed by the quantity of work I've been doing, particularly work involving power tools. I'm not sure that their amazement entirely redounds to my credit, actually. I admit, yes, I am kind of bone lazy, and yes, I'd twenty times rather ply a book or a computer mouse than a shovel, but that doesn't mean I'm incapable, particularly when properly motivated (as when a gun is pointed at my head or I am confronted with hideous mint-green paint day after day). Harumph. They should have seen me with that nail gun...

In any event, a good time was had by all, lunch came up beautifully, to be frank, if immodest (grilled chicken and polenta with blackberry-nectarine salsa, tomato gratin, and Spanish potatoes. Tasty!) and we had a very nice time showing everything off and visiting.

Now we need to schedule some more visits quickly before we run out of steam.

Tuesday, August 14, 2007

Tub, Shelves, Groundcloth, &c. &c.

We have been very energetic lately.

I touched up all the scuffs and smudges (that I could find) on our walls and doors, stripped and varnished a book shelf, and painted the outside of the pedestal tub. Also, Matt & I installed more metal edging and put down weed barrier.

Painting & Varnishing

The first two were pretty straightforward. Here's what's worth mentioning:

1) I impulse-bought a little bucket from Sherwin-Williams that is made for touch-ups. It has a special little lip so that you can scrape the excess paint off your brush without it going down the outside of the bucket; it has a magnet to hold your brush in place when you aren't using it; and it has a rubber handle that fits snugly over your hand.

The result is that you can carry it all over the house to make touch-ups without every dripping or spilling--it's a miracle! I was actually annoyed at the time of purchase--I had wanted just a cheap-o plain bucket for the task, not this fancy-pants professional-grade bucket with all the special features. However, there were no cheap-o buckets available, and as it turns out, the special features are killer. Love this bucket.

2) I bought a stain/varnish combo for the book shelf (which is an attractive but chintzy item that we got second-hand and originally came from Target). I didn't think it merited the complications of first staining, then varnishing. On a scale of 1 to 10, I'd give the varnish something like a 7.8. It's easy to use, but in the miserable sauna that is our metal garage in August, the varnish tended to a slight gloppiness.

Also, in order to get a somewhat even finish, you have to apply 3 coats, which is annoying. And finally, it instructed me to use steel wool between the 1st and 2nd coats. But steel wool leaves little steel fuzzies which apparently hang suspended in the air until you put down your next coat of varnish, at which point they materialize out of nowhere and leap on the wet lacquer all at once. Most aggravating. Still, for refinishing second-hand bookshelves from Target, it's all right. And if I'd used sand paper instead of steel wool, I'd have given the product an 8.6

Chintzy but attractive bookcase. Original finish was chipping off. Sanded & refinished.

The Tub Rebels

The tub is... more difficult.

Stuff I learned about tub epoxy:
1) Really, really, really don't put it on too thick. If you do, it may never, ever dry.
2) If you have glops or imperfections, rub at them with a xylene-soaked rag sometime before they're 100% dry--xylene dissolves partially dried epoxy.
3) Buy the air canisters in bulk if (like us) you idiotically opted not to buy a power sprayer.

I ended up rubbing off the bits that kept not drying; hopefully by now (2 days after the xylene and about 2 weeks after initial application) the tub's first coat will be dry, if very uneven.

I painted the outside of the tub a darker shade of the wall color, although Matt (presciently) implored me not to. It isn't that it looks bad--it just doesn't look at all exciting. I had thought it would be really zingy. Alas. The color wasn't as pretty as I expected, and it has surprising nautical connotations--if the Navy had pedestal tubs, they would probably paint them this color. It's not terrible, just... meh.
Oddly institutional grey-blue of our pedestal tub. Oh well.
I dunno--maybe when I install a new shelf and cabinet, and add the bathmath, and so on, it will all pop into place. Maybe.

Taming the Front Bed

I'm quite happy about the week barrier. The roundup worked a treat on the burmudagrass, so now we're covering their browning corpses to prevent them from ever returning again. Later, we'll mulch on top of the weed barrier. Hot work, though. Not hard work, per se, just hot--I absolutely rained sweat.

The brown bits are the dead bermudagrass--Mwahahaha!

But the steamy outdoor work gives me a proper appreciation for our front porch, which is nice and shady and even catches the odd breeze. It's surprising how much a variance of a few degrees matters--you would think everything over 95F would just be bad, but actually, when you go from our oven of a garage out into the yard, you'd swear the outdoors was cool and delicious. And when you go from working in the yard to our shady porch, that 98-degrees-in-the-shade is remarkably refreshing.

Tuesday, August 7, 2007

In Which I Inhale a LOT of Epoxy

Tonight I finally began a long-anticipated project: the resurfacing of our upstairs pedestal bathtub (ca. 1920-30). Our guest room has this wonderful old tub, rather like the one below, only dull, dinged, stained, and with a very unattractive tap. Just to clarify the intrinsic--if currently obfuscated--coolness of our tub, check out this reproduction, available from Restoration Hardware for the perfectly reasonable price of $4,299.00


A shinier, snazzier version of our tub

So it's a very cool tub. However, it's so scroungy, you don't really want to touch it with your bare hands, let alone your bare bum.

Rather than trying to extract the beast (which is larger than the bathroom door--we rather suspect that they moved the tub into place and then built the bathroom around it) and send it to a workshop that re-enamels your tub for you, we're doing the drastically downmarket version and coating it in this epoxy stuff:


It's called "Tile Doc," and it's an epoxy coating that you spray on top of your existing tile/porcelain to refinish it.

We're doing the guest tub first, so that we can use it during the 4 days it will take our master tub to dry.

The guy at the Sherwin Williams on Braker very sweetly agreed to tint the base for me, which meant a lot of eyeballing, adding a smidge, mixing, eyeballing, adding another smidge, and so on. It was really rather above and beyond of him. And it's so nice that he agreed to, because the color we've painted our trim and cabinets (white with a soupçon of moonglow) looks really awful paired with pure white.

Anyway, last night I prepped the tub with xylene (to take off any lingering traces of shine and to remove residues). I kind of like the smell of xylene--it reminds me of the hobby paints Dad uses for his model train. In addition, I'm told that it can be used to make meth; it's always so smart to have backup career plans. I think it can be used in explosives, as well. Versatile product.

Today I put down the first coat of Tile Doc, and let me tell you--when they warn against fumes, brother, they aren't kidding. You don't want to try talking while spraying--the stuff will literally make you gag. We had the vent going, the window and door open, and two fans blowing, and we were still swimming in a toxic miasma. The rest of the house still reeks of the stuff--I'm considering sleeping in the back of the Jeep.

Another key tip: do be very disciplined about putting down very light coats. I had problems with spraying too much, too closely, resulting in drips. You can try to soften the drips a bit while it's partially wet, but obviously it's better to avoid the problem altogether.

Incidentally, you may be wondering what kind of sprayer I used. I was only ever able to find Preval (the brand that gave me so much grief this past weekend), but I got a tutorial from the S-W guy, and either because of that or for some occult reason beyond my comprehension, it decided to work today. Very pleased about that.

I'll be putting down the next (last) layer in an hour--I'm blogging right from the thick of the action today. You are, in effect, embedded in the combat zone. Matt will be watching me, so if I keel over from the fumes, he can drag me off by the ankles. If you don't hear from us in a few days, you may want to send the police around to make sure we didn't suffocate in our sleep.

Just kidding.

Probably.

Update
Wed. a.m.

Okay--we survived the night. The 2nd coat didn't go quite as well as the first--the stupid spray canister wasn't working properly. It blew in spurts and stutters and suffered from low flow. I used a brand new air canister for the 2nd coat, too.

People. I implore you. If you ever take on this kind of task yourself, buy a power sprayer. Of course, they do require an air compressor, a fact that only serves to remind me of lost opportunities for buying useful tools back when we were bambooing. But we went through 2 air canisters last night, one of which didn't work properly, and we'll have to buy three more before this one project is finished. It'll presumably take 5 or 6 canisters to complete the master bath. Between the cost and the heartache, a power sprayer would definitely have been the prudent choice.

Nevertheless, the tub looks better this morning than expected. Because the spray flow was so low last night, the paint job came out all blotchy and we ran out of air before we had gotten through half the bottle of paint--so it was not only blotchy, but incomplete.

But epoxy is a viscous, oozy sort of substance, and I think that as it dries, it expands a bit and kind of mudges together, so it's less blotchy this morning than it was last night. Interestingly enough, it's still quite tacky, even wet. I'm not entirely sure when we'll be able to put down the next coat. But even with the splotches, it's already looking much, MUCH better, which is ever so gratifying.


Sunday, August 5, 2007

In Which I Finally Face Down the Baseboards

And Other Minor Domestic Catastrophes

We got off to a slow start this weekend, but we got a fair amount of outstanding chores done. We tentatively nailed the first pieces of baseboard to the wall in the dining room, put another coat of paint on the master bathroom door, painted and reinstalled the AC vents, and did some much-needed organizing in the study.

The AC Vents
That doesn't actually sound like that much, but as ever, the Quest was beset by complications and setbacks. The triumph is in the rising above, not so much in the actual achievement. The painting of the AC ceiling vents, for example, was made difficult several times over.

1) We had uninstalled 7 vents back in March during the wild flurry of painting, 5 of which I tracked to 3 different locations; the remaining two are still AWOL.
2) Only 1 of those vents had any screws with it.
3) I decided to use this inexpensive little product that turns your normal paint into spray paint, hoping to avoid a repeat of the shutter-painting nightmare that so traumatized me back in May. So of course, the trauma just took a different form. I bought two cartridges--one for the tub epoxy and one for the vents. First the one didn't work, then the other didn't work. Then I tried the first one again and it still didn't work. So I played around with the second one, pulling out the plastic pipe, twisting the nozzle, twisting the base, and it still didn't work. Finally, I put the first one back on with the pipe from the second one--and it worked! Why? I don't know!

Evil paint sprayer by Preval

Naturally, when I went back to apply a second coat, both cartridges utterly refused to play. I tried all the tricks from the first go round to no avail. So our air vents only have 1 coat of paint--so sue us. From the ground, they look fine. Before I try to epoxy the tubs, I'm going to look for another brand of sprayer. This is much too complex to mess with when trapped in a tiny room with wickedly toxic brain cell-killing fumes.

Interestingly, the struggled didn't end with the painting. Screwing the darn things back in was equally vexing. I ran to Ace (fortunately, only about 5 blocks from our house--we've saved a lot of money in gas thanks to that Ace) to get some replacement screws (FYI, air vents require "sheet metal screws." Word to the wise, should you ever find yourself in a similar situation). I guess they were either fractionally fatter or slightly longer than the originals, because I actually couldn't get the little beasts in, and it took Matt a good 45 minutes to handle the 4 vents he ended up working on. (I did do the master bath all by myself--go Melanie! That was the one with the original screws, and they twirled right into place, easy as pie.) He kept trying different screwdrivers, a drill, a ratchet with a screwdriver attachment (which he later threw out in a fit of fury--apparently, it was nowhere near capable of the project with which it found itself tasked). The tools mostly let him down--I think it was his sheer determination, liberally greased with sweat, that ultimately forced the screws to submit.

So that was fun.

The Baseboards
Then we turned our attentions to the baseboards, which had just this morning received their final coat of paint. Okay. This is slightly complex. We were putting down baseboards to span the junction of our kitchen and our dining room. Now, the kitchen has old-style baseboards, like the living room. About 9 inches tall, nailed directly to the studs, with the wallboards resting on top of the baseboards, which makes the ~3/4" baseboards appear to be about 1/4" thick.

The dining room, on the other hand, has wallboard (almost) all the way down to the floor. It had cheap, modern plywood baseboards that were only 5" tall. We needed to replace the kitchen baseboard because we had torn it up when we attempted to remove it for the benefit of the tile guys. And because of the gaping hole, we needed to go with something that was at least 9" tall. We wanted the dining room to match the kitchen, since they're joined, but the dining room is ~1" lower than the kitchen and has walls all the way down.

Are you with me so far? Solid and lower in the dining room; big gaping hole and 1" higher in the kitchen.

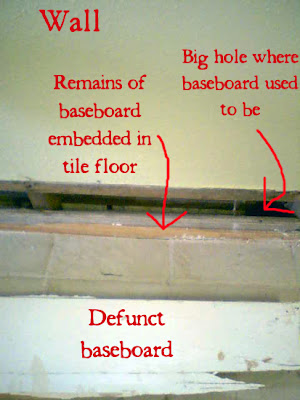
So we wanted to stick the new baseboards below the level of the kitchen tile so that it would have an unbroken profile from the kitchen to the dining room, despite the 1" step. However, we had ended up leaving the baseboard in place during the tiling once we saw that there was nothing but a void behind it--we knew it would be a long time before we'd get to the baseboards, and we didn't want varmints strolling into the kitchen through the hole. Consequently, the tile guys tiled in the baseboards.

So in order to have level baseboards, we had to dig out the pieces of baseboards from below the level of the tile.


We weren't really sure what the approved tool is for this kind of work, so we approached the job with an enthusiastic eclecticism: we had two hammers, a crowbar, a chisel, a stout flathead screwdriver (the same that we used for prying up the ugly tiles in the bathroom), a power screwdriver/drill, and a crowbar.

I can now conclusively report that none of these was the right tool for the job. I drilled little holes in lines to try to weaken the board; Matt chipped into it with the screwdriver, I nibbled away at tiny sections with the crowbar... Progress was glacial. We hacked and banged and pried for about 45 minutes on a 7-foot section before we finally prised the last bit of baseboard out of the floor.

And, of course, crowning irony, when we dropped the board into our painstakingly carved-out trench, it was too short to cover all of the hole.

So we're going to have a drop-off in baseboard height after all at the junction of the kitchen and dining room. We also need to buy a different kind of nails--the ones we have that are long enough have great big honking heads. In addition, the wall flexes in slightly at the juncture, which means that the dining room baseboard is both lower and more protuberant than the kitchen baseboard. We want to ease that transition with some quarter round or similar. Uf. Always with the complications.

Everything Else
On a happier side, we roundup'd the bermudagrass in our flower beds (that environmentally friendly approach that we tried with the plastic didn't work for crap. There were a couple of patches of very lightly scalded leaf tips, and that's it. It was time to bring in the chemicals.) Mulch didn't work, plastic didn't work, hoeing didn't work--but I know roundup will take the little stinkers out, and that's wonderfully satisfying.

We also staked several of our baby trees, which have been listing drunkenly for the past month and a half. Matt thinks they would have righted themselves with time, but I was afraid they'd just harden in a depressed slouch.

And I touched up the "Nurtria" paint in the kitchen and dining room. Looks much better now that all the scratches and scuffs from swirling the furniture around for the past two months have been covered.

So, no project really completed, but at least measurable progress on several fronts. And I don't think I'll be afraid of baseboards again. Compared to the misery of slowly chipping tiny shard of baseboards out of my floor, nothing else the house can come up with in the way of baseboards can be much of a challenge.

Wednesday, August 1, 2007

Ah, the Invigorating Fragrance of Latex

You may recall that our bedroom walls were two colors: a sort of deep moss and, to my despair, mint green. It was supposed to be fern green, but the lummoxes (lummoxi?) at Lowe's apparently mis-mixed it. At the time, there was carpet to install, furniture to shuffle, and no budget for repainting. So all this time, I've been waking up in the morning and rolling out of bad to get a faceful of winter-fresh circa-1986 mint green. Yech.

As part of my new push to get the house tamed (I like to think of it as a surge, the end result of which will be shock and awe. In a good way. I hope.), I decided to take back the wall. So we got a new shade of paint (I don't even trust them to attempt "Soft Reflections" anymore. We're now going with "Martinique Morn" instead), put down drop cloths, put up painters' tape, and moved the furniture. The new color is MUCH better (a sort of deep fern), and we plan to get the second coat down tomorrow night. Huzzah!

A rough approximation of Spring Eve (L) and Martinique Morn (R)

I also put a second coat on the three pieces of baseboards and on the bathroom door. That means that by tomorrow evening, if all goes well, the baseboards will be ready to install. I'm still feeling a bit inhibited and reluctant, but at least I've got a little momentum going.

Oh, and I installed our first batch of cabinet knobs in the master bath. They're from Restoration Hardware. They're so very chi-chi that I had to buy them in installations--half this week, half the next. But darn it, they're just so suitable. They match our one original door knob, and they look so adorably fin de siècle. See?

Stylin' but costly new cabinet knobs for the master bath

And finally, we're trying to kill off the burmudagrass (which is threatening to choke our shrubs) by covering it with clear plastic and letting the sun braise it. With astonishingly good timing, the weather has actually been sunny all week for the first time since May, so there is some hope of success.
Related Posts with Thumbnails